Cisco FTD (syslog)

Configure Cisco FTD for syslog forwarding to Radiant Security.

In this guide, you'll configure Cisco FTD, a next-generation firewall and intrusion prevention system (IPS), to forward logs to Radiant Security using the Radiant Agent. Cisco FTD provides more comprehensive security capabilities than Cisco ASA, which is primarily focused on firewall functionality.

Prerequisites

Add the data connector in Radiant Security

  1. Log in to Radiant Security.

  2. From the navigation menu, click Settings > Data Connectors and click + Add Connector.

  3. Search for and select the Cisco FTD (syslog) option and then click Data Feeds.

  4. Under Select your data feeds, select Cisco FTD (syslog) and click Credentials.

  5. Under Credential Name, give the credential an identifiable name (e.g. Cisco FTD Credentials).

  6. Under Required Credentials, add a Connector tag value. This value can be random and will be used as a salt to generate the unique connector Token which you’ll download in the next step.

  7. Click Add Connector.

  8. Copy and save the Token value.

  9. Click Done to save your changes.

Configure a local Radiant Security Agent

Refer to the Install the Radiant Security Agent guide to set up a local agent to collect the logs.

Configure Cisco FTD to forward logs to the Radiant Agent

  1. Log into the Cisco FDM UI with a config user.

  2. Select the desired Cisco FTD device on the top navigation bar.

  3. Under System Settings, select Logging Settings.

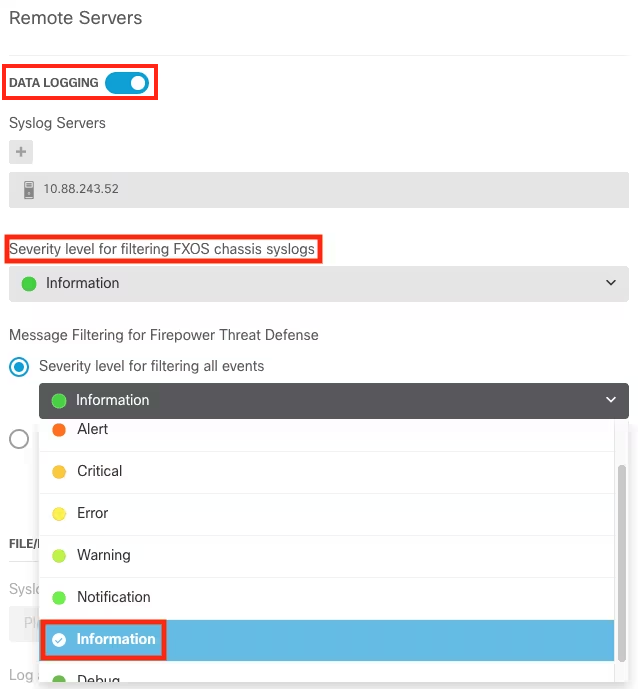
  4. Enable Data Logging.

  5. Under Message Filtering for Firepower Threat Defense, set the Severity level for filtering all events as Information.

  6. Under Syslog Servers, click the + button to add a new syslog server.

  7. Click Create new Syslog Server.

  8. Enter the IP address of the Radiant Agent deployed to your environment previously.

  9. For Protocol Type select TCP.

  10. For Port Number enter <Radiant Agent Port>.

  11. Under Interface for Device Logs, select an interface with connectivity to the Syslog Forwarder.

  12. Click OK and select the newly created Syslog Server.

  13. Click SAVE to save the changes.

  14. Click the deploy button to deploy the changes.

Last updated