Set up O365 to Forward Phishing Emails to Radiant Security
Auto-forward O365 phishing emails to Radiant Security.
Overview
Radiant Security analyzes phishing emails reported by end users for malicious indicators. Each email is evaluated against a series of questions or actions that determine if an email is benign or malicious.
In order to analyze these emails, Radiant Security needs access to the original email reported by end users. We do this by forwarding emails from your dedicated in-house phishing mailbox to a mailbox on our side.
This guide will walk you through how to set up Microsoft O365 to automatically forward suspected phishing emails to Radiant Security for triage and investigation.
.png?width=688&height=149&name=Screen%20Shot%202022-03-15%20at%204.25.56%20PM(1).png) Prerequisites
Prerequisites
This configuration requires that you are an administrator of the O365 account.
Configure Method for Reporting Phishing Emails
There are four configuration requirements that are necessary to complete in order to enable the Report Phishing button so that an end user can submit a suspected phishing email:
Create a dedicated phishing mailbox
In this step, you will create a dedicated phishing mailbox for your organization.
|
1. Log in to the Admin Exchange Center portal.
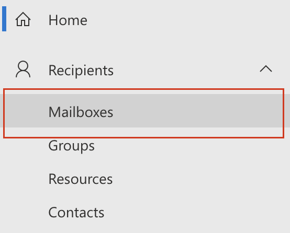
2. From the menu, navigate to Recipients > Mailboxes.
|
 |
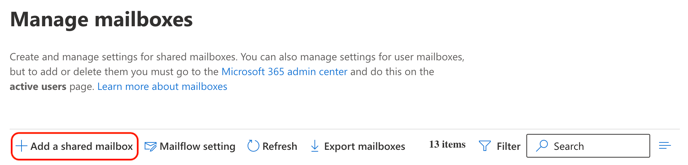
| 3. Click + Add a shared mailbox. |
 |
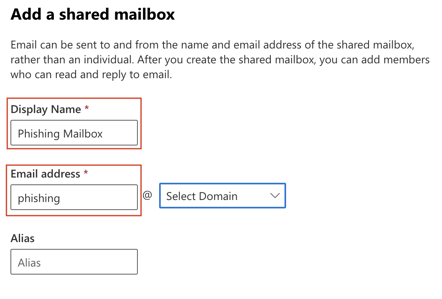
4. Fill in the details for the mailbox:
- Display Name:
Phishing Mailbox
- Email address:
phishing
- Select Domain: <select your domain>
5. Click Create to save the new mailbox. |
 |
Enable auto-forwarding to Radiant Security
Next, enable auto-forwarding O365 to automatically forward emails from your new dedicated phishing mailbox to Radiant Security. You can choose to do this in O365 client or in the Outlook application. Complete the following series of steps to enable auto-forwarding.
Add Radiant Security as a Trusted Domain
In this step, you will enable forwarding emails from your domain to our external domain.
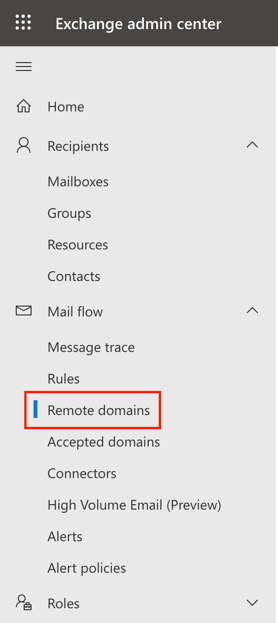
1. From the Exchange Admin Center menu, navigate to Mail flow > Remote domains.
Click + Add Remote Domain.
2. Click + Add a Remote Domain.
|
 |
|
3. Fill in the details for the external domain:
|
|
4. Click Next.
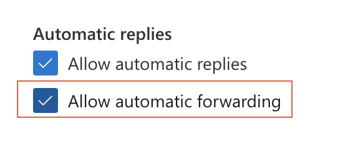
5. On the Email reply types page, confirm that Allow automatic forwarding is enabled.
6. Keep all default settings unchanged and click Next.
|
 |
7. Click Next to skip the Message reporting and Text and character set pages, leaving them with the default settings.
8. Click Save to add the external domain.
9. Click Done. |
Add “Radiant Security Alerts” as a contact
In this step, you’ll add Radiant Security as a contact so that we receive the forwarded phishing emails to a mailbox on our side.
|
1. From the Exchange Admin Center menu, navigate to Recipients > Contacts.
2. Click Add a mail contact.
|
.png?width=619&height=337&name=image(9).png) |
3. Fill in the following contact details:
- Display Name:
Radiant Security Alerts
- Alias:
radiant-security-alerts
- Email address:
alerts@report.radiantsecurity.ai
|
.png?width=606&height=620&name=image(10).png) |
|
4. Leave the remaining fields blank and click Next.
5. Click Next to skip the optional information page and click Create to finish the process.
|
.png?width=688&height=779&name=image(11).png) |
Set up Auto-Forwarding
In this step, you’ll configure O365 to automatically forward all suspected phishing emails to the new Radiant Security Alerts contact created in the previous step.
| 1. From the Exchange Admin Center menu, navigate to Recipients > Mailboxes. |
|
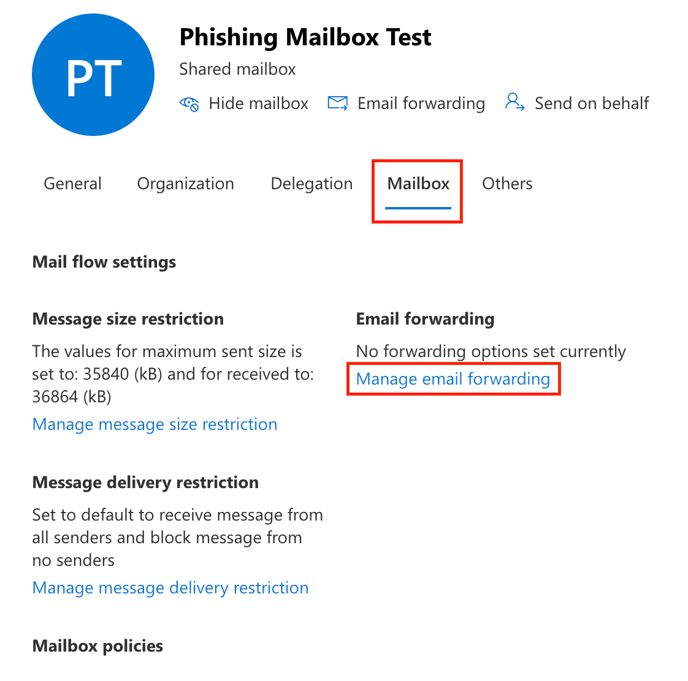
2. Locate the Phishing Mailbox that you created in the first step and click on its row.
3. In the pop-out menu, click the Mailbox tab and then click Manage email forwarding.
|
 |
| 4. Enable the Forward all emails sent to this mailbox option, and then click Forward to an internal email address > Search email. |
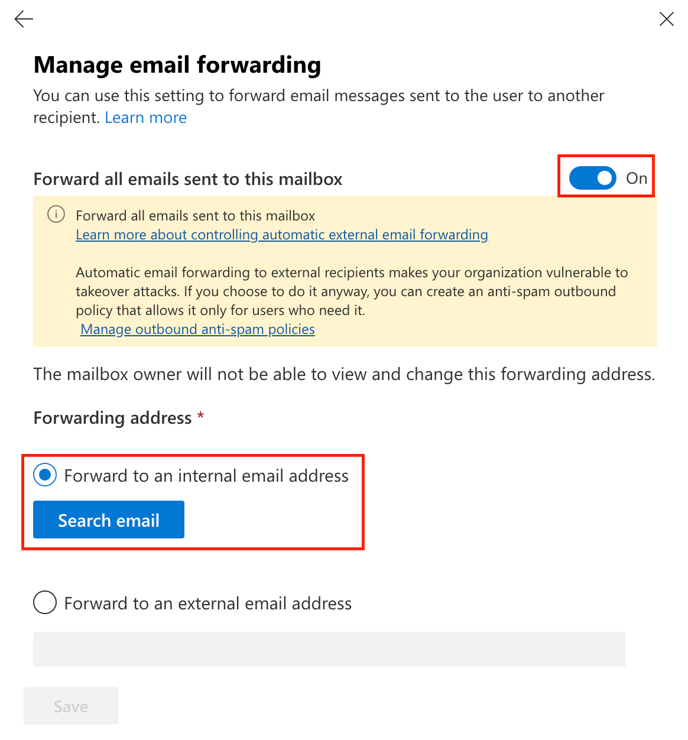 |
| 5. Search for and select the Radiant Security Alerts contact created in the previous step and click Add. |
| 6. Click Save. |
7. Back on the mailbox configuration menu, click Manage message size restriction:
- Sent messages maximum size (KB):
153600
- Received messages maximum size (KB):
153600
8. Click Save.
|


|
Enable the Report Phishing button
In this step, you’ll enable the O365 right-click action which allows a user to report suspected phishing emails to the dedicated phishing mailbox you created in the previous ste
| 1. Log in to Microsoft 365 Defender. |
|
2. Go to the User reported settings page.
Alternatively, from the left side menu, navigate to Investigation & Response > Actions & Submissions > Submissions.
3. Click the gear icon.
|
.png?width=688&height=368&name=image(7).png) |
|
4. Select the Monitor reported messages in Outlook checkbox.
5. For Select an Outlook report button configuration:
- Select Use the built-in Report button in Outlook.
6. For When a user reports an email:
- Select the Ask the user to confirm before reporting and Show a success message after the message is reported checkboxes.
|
.png?width=688&height=554&name=image(6).png) |
| 7. On the section Reported message destinations, from the drop-down, select Microsoft and my reporting mailbox. |
|
8. For Add an exchange online mailbox to send reported messages to, enter and select the mailbox that you created in the Create a dedicated phishing mailbox step. It should appear as a suggested contact.
9. Leave all other default settings unchanged and click Save.
|
.png?width=688&height=362&name=image(8).png) |
Allow forwarding to an external email
|
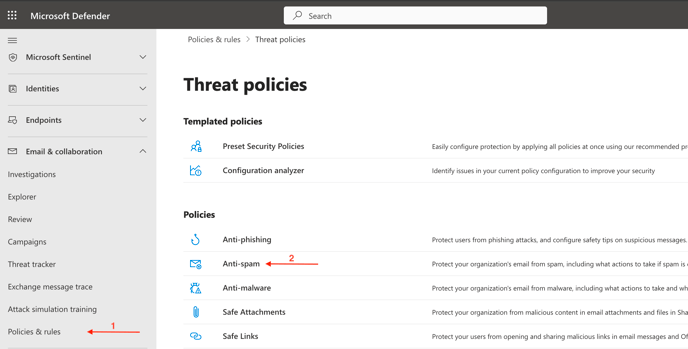
1. Still on Microsoft 365 Defender, go to the Anti-spam policies page. Alternatively, navigate to Email & Collaboration > Policies & rules > Threat policies > Anti-spam policies.
|
 |
| 2. Click + Create Policy and select Outbound. |
.png?width=688&height=491&name=image(1).png) |
|
3. Fill in the details for Name your policy:
- Name:
Forwarding alerts to Radiant Security
- Description:
Policy used to forward possible phishing mails from the internal phishing@<domain> mail box to Radiant Security
4. Click Next.
|
.png?width=688&height=267&name=image(2).png) |
|
5. Under Users, groups, and domains, for Users select the mail box created previously Phishing Mailbox.
6. Leave Groups and Domains blank.
|
.png?width=688&height=498&name=image(3).png) |
|
7. Under Protection settings, for Forwarding rules set Automatic forwarding Rules to On - Forwarding is enabled.
Leave all default settings unchanged.
8. Click Next to review and then click Create to save the forward rule.
9. Click Done to exit the page.
|
.png?width=688&height=640&name=image(5).png) |
Report a test email
In this step, you’ll report an email in order to make sure the integration is working and also that there is organizational knowledge on how to report phishing emails end-to-end.
| 1. Log into a mailbox within your organization, generate a test message by sending an email to yourself, and then click on that email message. |
|
2. Report the test message as phishing.
-
- In case you’ve configured the Report Phishing button, use it to easily report the test message as phishing
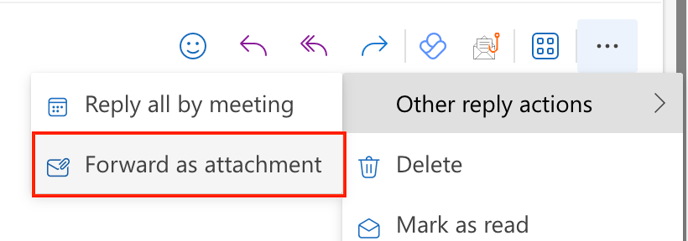
- In case you haven’t configured the Report Phishing button, click the
… and choose Other reply actions and then click Forward as attachment. In the To field, enter the dedicated phishing mailbox address within your organization and send the email.
|

|
| 3. The email will take a couple of minutes to show up on Radiant Security. |
We value your opinion. Did you find this article helpful? Share your thoughts by clicking here or reach to our Product and Customer Success teams at support@radiantsecurity.ai
Last updated: 2024-09-20
