Elastic SIEM (webhook)
Configure Elastic SIEM to forward alerts to Radiant Security via webhook.
Overview
Elastic SIEM is a big data solution that provides security information and event management (SIEM) capabilities for on-premises and cloud environments. After completing this guide, Radiant Security will triage alerts configured in your Elastic SIEM environment.
You’ll do this by completing the following steps:
Prerequisites
- Superuser or elastic_security_admin access level, or any other role that has write access to Elastic SIEM and Connectors
Add the data connector in Radiant Security
1. Log in to Radiant Security.
|
| 2. From the navigation menu, click Settings > Data Connectors and click + Add Connector. |
| 3. Search for and select Elastic SIEM (webhook) option from the list and then click Data Feeds.
|
/Screenshot%202025-01-16%20at%2015.53.20%20copy.jpg?width=682&height=1352&name=Screenshot%202025-01-16%20at%2015.53.20%20copy.jpg) |
| 4. Under Select your data feeds, select Elastic SIEM and click Credentials. |
/ElasticSIEMDataFeed%20copy.jpg?width=682&height=1365&name=ElasticSIEMDataFeed%20copy.jpg) |
|
5. Under Credential Name, give the credential an identifiable name (e.g. Elastic Webhook Credentials).
6. Under Required Credentials, enter a Connector tag (e.g. webhook_connector).
7. Click Add Connector.
|
/ElasticSIEMCredentials%20copy.jpg?width=682&height=1355&name=ElasticSIEMCredentials%20copy.jpg) |
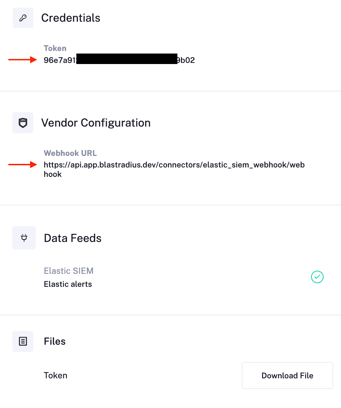
| 8. Open the newly created connector. Under Vendor Configuration, copy the Token and the Webhook URL values. You’ll need them in to create the webhook in the Create the webhook connector section. |
 |
Configure the URL allow list
Note: This step is only required if your environment is not using the xpack.action.allowedHosts setting with the default value ["*”].
The xpack.action.allowedHosts setting restricts the hosts that Elastic can connect to when executing actions such as webhooks. This is a security measure to prevent unauthorized or unintended network access.
The steps below must be applied to all Elasticsearch nodes on the cluster:
- Navigate to the
config directory and open the elasticsearch.yml file.
- Locate the line
xpack.action.allowedHosts.
- If the setting contains a value
["*”] ****then ****there is no need to update it.
- If the setting contains any value different than
["*”] , include the following entry: https://api.app.blastradius.ai
- Save and close the file.
- Restart the node to apply the new configuration.
Create the webhook connector
In this section, you’ll create the webhook connector by adding in the Token and Webhook URL values.
1. Access Kibana.
|
| 2. From the navigation menu, click Management > Stack Management > Connectors and click Create Connector. |
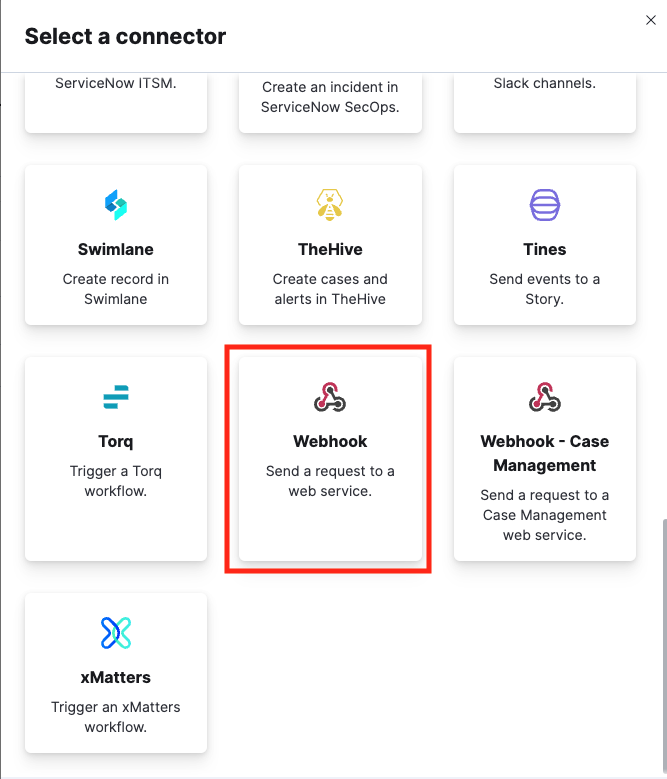
| 3. Select Webhook from the list.
|
 |
|
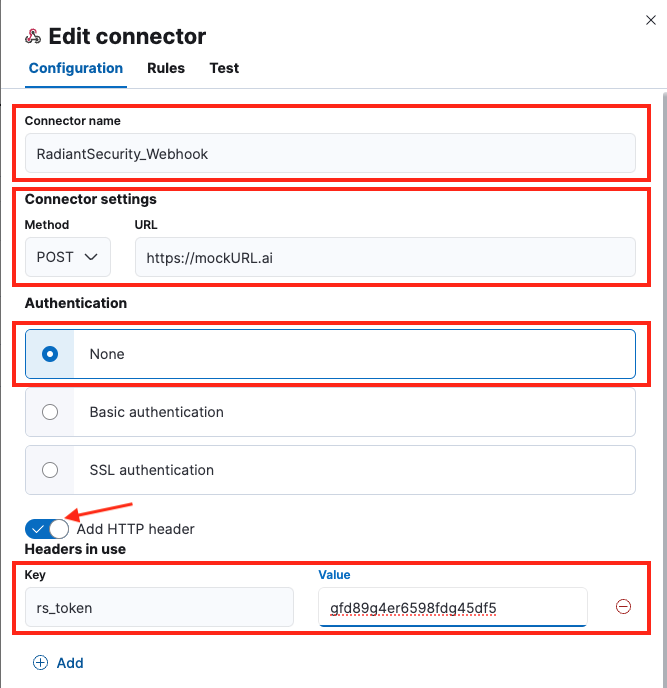
4. On the Configuration tab, enter the following values:
-
Connector name: RadiantSecurity_Webhook
-
Method: POST
-
URL: Paste in the Webhook URL that you copied during the data connector setup
-
Authentication: None
-
Enable the Add HTTP Header option.
-
Click Add:
-
- Key: rs_token
- Value: Paste in the Token that you copied during the data connector setup
|
 |
| 5. Click Save and test. |
|
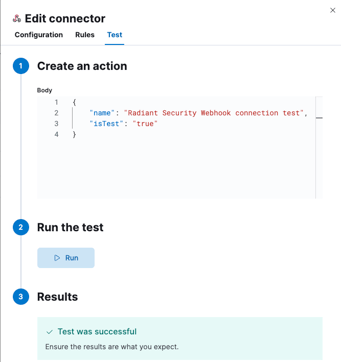
6. In Edit connector, click the Test tab. Copy and paste the following payload to the Body section:
{
    "name": "Radiant Security Webhook connection test",
    "isTest": "true"
}
7. Click Run.
8. If the test is successful, click Close.
9. If the test fails, review the URL and the Token in the Configuration tab and make sure they match the values provided during the Add the data connector in Radiant Security section.
|
Configure rules to use the webhook action
In this step you'll configure the detection rules to use the webhook action to send alerts to Radiant Security.
1. Access Kibana.
|
| 2. From the navigation menu, click Security > Rules. |
|
3. For each rule you want to forward notifications to Radiant Security, do the following:
-
- Click on the rule name.
- Click Edit rule settings.
- Navigate to the Actions tab.
- Click Webhook and select the newly created Webhook connector (e.g.,
RadiantSecurity_Webhook).
- On the Webhook connector section, select the newly created Webhook connector.
- For Action frequency, select For each alert and then Per rule run.
- Copy the following template and paste it in the Body section. Click Save changes.
|
/image(1).png?width=688&height=521&name=image(1).png) |
{
  "rule_name": "{{rule.name}}",
  "alert_id": "{{context.alerts.0._id}}",
  "rule_uuid": "{{alert.uuid}}",
  "alert_timestamp": "{{context.alerts.0.kibana.alert.last_detected}}",
  "rule_severity": "{{context.rule.severity}}",
  "alert_count": "{{state.signals_count}}",
  "rule_description": "{{context.rule.description}}",
  "rule_index": "{{context.rule.index}}",
  "rule.tags": "{{rule.tags}}",
  "event": {
  "event_index": "{{context.alerts.0.kibana.alert.ancestors.0.index}}",
  "event_timestamp": "{{context.alerts.0.@timestamp}}",
  "hostname": "{{context.alerts.0.host.name}}",
  "srcIP": "{{context.alerts.0.source.ip}}",
  "destIP": "{{context.alerts.0.destination.ip}}",
  "srcport": "{{context.alerts.0.source.port}}",
  "destport": "{{context.alerts.0.destination.port}}",
  "url": "{{url.full}}",
  "username": "{{context.alerts.0.user.name}}",
  "action": "{{context.alerts.0.event.action}}",
  "filename": "{{context.alerts.0.event.file.name}}",
  "filepath": "{{context.alerts.0.event.file.path}}",
  "filemd5": "{{context.alerts.0.event.file.hash.md5}}",
  "filesha256": "{{context.alerts.0.event.file.hash.sha256}}",
  "vendor": "{{context.alerts.0.event.observer.vendor}}",
  "product": "{{context.alerts.0.event.observer.product}}",
  "threat": "{{context.alerts.0.kibana.alert.rule.parameters.threat}}",
  "category": "{{context.alerts.0.kibana.alert.rule.category}}",
  "rawData": "{{context.alerts}}"
  }
}
|
Note: This template was built based on the Elastic Common Schema.
We value your opinion. Did you find this article helpful? Share your thoughts by clicking here or reach to our Product and Customer Success teams at support@radiantsecurity.ai
Last updated: 2025-01-21

/Screenshot%202025-01-16%20at%2015.53.20%20copy.jpg?width=682&height=1352&name=Screenshot%202025-01-16%20at%2015.53.20%20copy.jpg)
/ElasticSIEMDataFeed%20copy.jpg?width=682&height=1365&name=ElasticSIEMDataFeed%20copy.jpg)
/ElasticSIEMCredentials%20copy.jpg?width=682&height=1355&name=ElasticSIEMCredentials%20copy.jpg)


/image(1).png?width=688&height=521&name=image(1).png)