Defender for Endpoint via Event Hub
Add the Microsoft Defender via EventHub data connector.
Overview
Radiant Security needs to establish a trusted relationship with your Microsoft account in order to retrieve Defender for Endpoint events and alerts via Event Hub integration.
To do this, you’ll need to complete the following steps:
At the end of this configuration, you will provide Radiant Security with these values:
- Application (client) ID
- Directory (tenant) ID
- Client Secret Value
- Event Hub name
- Event Hub namespace (URL)
Prerequisites
This configuration requires that you are an administrator in your Azure Tenant.
Register the application with Microsoft Entra ID
Note: You might already have an application configure for other radiant Integrations, it’s okay to reuse it.
In this step, you’ll register a new application with Microsoft Entra ID.
| 1. Log in to the Microsoft Azure Portal. |
|
| 2. From the left side menu, navigate to Microsoft Entra ID. |
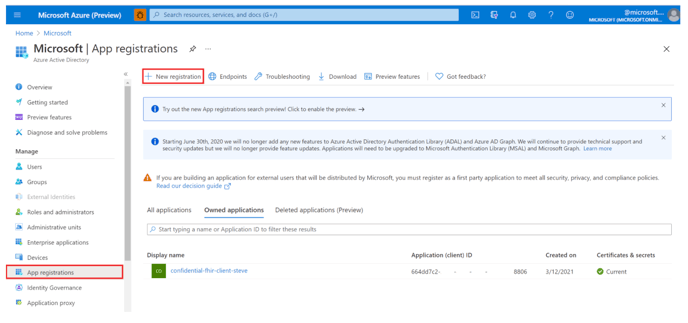
| 3. From the left menu, navigate to App Registrations. |
|
4. Click + New Registration.
|
| 5. Update the application Name to
radiantsecurity-connector and leave all default settings unchanged.
|
.png?width=688&height=604&name=Screen%20Shot%202022-03-16%20at%201.42.16%20PM%20(1).png) |
| 6. Click Register to save the changes. |
7. On the newly registered application page, copy the following values:
-
- Application (client) ID
- Directory (tenant) ID
|
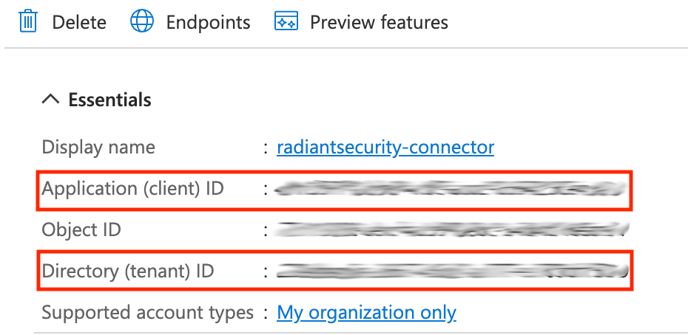 |
| 8. On the same page, click the link for Add a certificate or secret. |
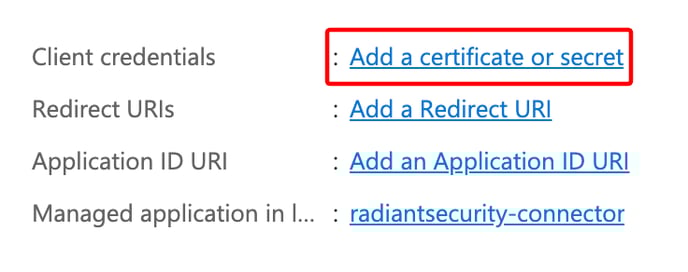 |
9. In the Add a client window, click + New Client Secret.
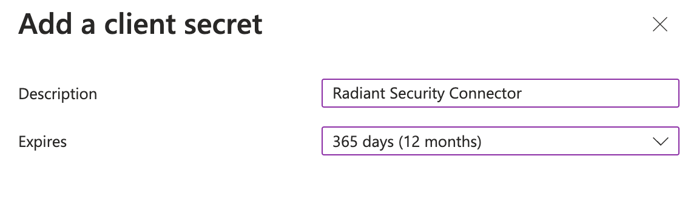
10. Set the client secret as:
-
- Description:
Radiant Security Connector
- Expires:
12 months
|
 |
| |
| 11. Click Add. |
|
| 12. The client secrets page will automatically open. |
|
13. Copy the Value (not the Secret ID field).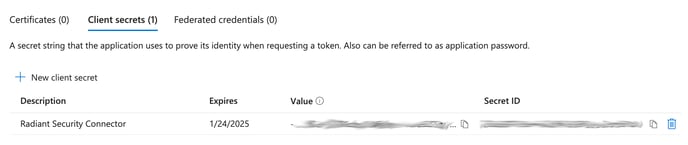
|
Important note: Ensure you copy the Client secret value now as you won't be able to look it up again later. You will need to provide it to Radiant Security at the end of the configuration.
Create an Event Hub
| 1. Log in to Azure Portal. |
|
| 2. Navigate to the Event Hubs service. |
.png?width=688&height=260&name=image%20(13).png) |
| 3. Click Create. |
|
| 4. Select the subscription and resource group where the Event Hubs Namespace must be created. |
| 5. Enter a unique name for the Namespace. |
.png?width=688&height=646&name=image%20(14).png) |
| 6. Select the region. |
|
| 7. Click Next. |
|
| 8. Choose Basic for the pricing tier. |
|
| 9. Leave the throughput units or processing units as default. |
| 10. Click Review + Create. |
|
| 11. After the deployment is complete, click on Go to resource. |
| 12. On the Overview page, get the Host Name value, as it will be used on the next section. |
.png?width=688&height=296&name=image%20(15).png) |
| 13. Click on + Event Hub to create a new Event Hub on the newly created Namespace. |
| 14. Enter a name for your event hub, then click Review + Create. |
| 15. In the EventHub page, go to Access Control (IAM) and click Add + → Add role assignment. |
.png?width=688&height=379&name=image%20(16).png) |
| 16. Select the role Azure Event Hubs Data Receiver. |
| 17. Click Next and on Members, click + Select Members. |
| 18. Select the Azure Application created in the previous section and click Review + assign. |
Configure Azure Streaming API on Microsoft Defender
| 1. Log in to Microsoft Defender Portal. |
|
| 2. Navigate to Settings > Microsoft Defender XDR > Streaming API and select Forward events to Event Hub. |
| 3. Enter the Event Hub Resource ID and the Event Hub name obtained previously. |
| 4. Select all Event Types within the Device and Alerts & behaviors categories. |
.png?width=645&height=698&name=image%20(17).png) |
| 5. Click Submit. |
|
Add the connector in Radiant Security
1. Log in to Radiant Security.
|
| 2. From the navigation menu, click Settings > Data Connectors. |
| 3. Click + Add Connector. |
| 4. From the list of connectors, select Microsoft Defender for Endpoint via Event Hub. |
5. Add the following values you saved from the previous steps:
-
- Application (client) ID
- Directory (tenant) ID
- Client Secret Value
- Event Hub name
- Event Hub namespace URL
|
| 6. Click Add Connector to save the connector configuration. |
We value your opinion. Did you find this article helpful? Share your thoughts by clicking here or reach to our Product and Customer Success teamsat support@radiantsecurity.ai
Last updated: 2025-05-21
